Best Printing Calculators to Buy in July 2026
Canon P23-DHV-3 Printing Calculator with Double Check Function, Tax Calculation and Currency Conversion
- HASSLE-FREE PAPER LOADING WITH A HIGHER SLOT DESIGN.
- STAY ORGANIZED WITH BUILT-IN CLOCK AND CALENDAR FEATURES.
- STREAMLINE OPERATIONS WITH INTEGRATED TAX AND BUSINESS CALCULATIONS.


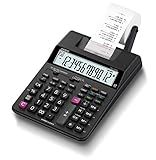
Casio HR-170RC Plus – Mini Desktop Printing Calculator | Check & Correct, Cost/Sell/Margin, Dual-Color Print | Ideal for Taxes, Bookkeeping & Accounting Tasks
-
FAST DUAL-COLOR PRINTING: DISTINGUISH VALUES EASILY AT 2.0 LINES/SEC.
-
EFFICIENT ERROR CORRECTION: REVIEW AND RE-PRINT UP TO 150 STEPS SWIFTLY.
-
COMPREHENSIVE FINANCIAL FEATURES: SIMPLIFY TAXES, MARGINS, AND CURRENCY QUICKLY.

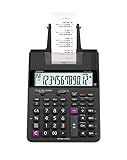
Casio HR-10RC Mini Desktop Printing Calculator | Portable | 12-Digit Display | One-Color Printer | Tax & Currency | Ideal for Taxes, Bookkeeping & Accounting Tasks
-
PORTABLE MINI SIZE: COMPACT DESIGN FOR EASY USE ANYWHERE, ANYTIME.
-
BIG LCD DISPLAY: EASY-TO-READ SCREEN FOR QUICK, ACCURATE CALCULATIONS.
-
EFFICIENT RECORDKEEPING: PRINTS DATE/TIME FOR RELIABLE RECEIPTS AND BUDGETS.
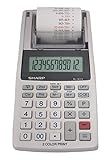
Sharp EL-1801V Ink Printing Calculator, 12-Digit LCD, AC Powered, Off-White, Ideal for Business & Office Use, Easy-to-Read Display & Durable Design
-
EFFORTLESS TYPING: SMOOTH, ERGONOMIC KEYS ELIMINATE FINGER FATIGUE.
-
QUICK READABILITY: COLOR-CODED PRINTING FOR INSTANT, CLEAR TOTALS.
-
DURABLE DESIGN: HEAVY-DUTY BUILD ENSURES LONGEVITY AND EASY UPKEEP.
Casio HR-170RC Printing Calculator – 12-Digit Display | 2-Color Print, Reprint & Correction | Ideal for Bookkeeping, Accounting & Tax Work
-
EASY DATA ENTRY: LARGE 12-DIGIT DISPLAY AND WELL-SPACED KEYS.
-
ERROR-FREE PRINTING: TWO-COLOR OUTPUT PREVENTS COSTLY READING MISTAKES.
-
REVIEW CALCULATIONS: CHECK & CORRECT CALCULATIONS UP TO 150 STEPS.
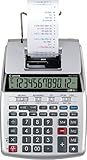
Victor Printing Calculator, 1208-2 Compact and Reliable Adding Machine with 12 Digit LCD Display, Battery or AC Powered, Includes Adapter,White
- EXTRA LARGE 12-DIGIT DISPLAY FOR EASY READING
- FAST 2.3 LINES/SECOND PRINTING FOR QUICK TRANSACTIONS
- ECO-FRIENDLY DESIGN WITH 20% RECYCLED PLASTIC
Sharp EL-1611V Handheld Portable Cordless 12 Digit Large LCD Display Two-Color Printing Calculator with Tax Functions
- COMPACT & CORDLESS: TAKE CALCULATIONS ANYWHERE, HASSLE-FREE.
- LARGE LCD & DUAL COLOR PRINTER: CLEAR VISIBILITY FOR ALL YOUR NUMBERS.
- VERSATILE FUNCTIONS: DECIMAL, ROUNDING, PERCENT & TAX-ALL IN ONE.
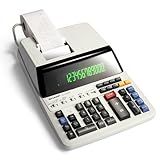
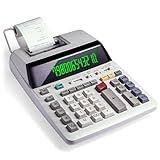
Sharp EL-1197PIII Heavy Duty Color Printing Calculator with Clock and Calendar
- FAST & QUIET: 4.5 LINES/SEC, IDEAL FOR BUSY WORK ENVIRONMENTS.
- EYE-FRIENDLY DISPLAY: BRIGHT, CLEAR PRINTOUTS REDUCE STRAIN AND ENHANCE TRUST.
- USER-FRIENDLY DESIGN: INTUITIVE LAYOUT ENSURES NO LEARNING CURVE REQUIRED.
To adjust the print density on a printing calculator, you will typically need to locate the print density setting button on the calculator. This button may be labeled as "PD" or "Print Mode" on the keypad. Once you have located the button, press it and use the arrow keys or scroll wheel to adjust the print density to your desired level. Some printing calculators may have different levels of print density that you can choose from, ranging from light to dark. Once you have selected your desired print density, press the enter or equal sign button to save the setting. You can test the print density by printing a calculation to ensure that it is set to your liking.
What is the recommended print density setting for most printing calculators?
The recommended print density setting for most printing calculators is between 10 to 12 characters per inch.
What tools do I need to adjust the print density on a printing calculator?
To adjust the print density on a printing calculator, you may need the following tools:
- User manual of the printing calculator
- Screwdriver (if the print density adjustment requires opening the calculator)
- Soft cloth or cleaning brush (to clean the print head)
- Alcohol wipes or cleaning solution (to clean the print head)
- Replacement ink or ribbon (if the print density is affected by low ink or worn-out ribbon)
What is the importance of maintaining the print density on a printing calculator?
Maintaining the print density on a printing calculator is important for several reasons:
- Legibility: Proper print density ensures that the numbers and characters printed by the calculator are clear and easy to read. This is especially important for financial calculations or any other situations where accuracy is crucial.
- Accuracy: In situations where calculations are required to be documented or shared with others, maintaining print density helps to ensure that the calculations are accurately recorded and can be easily double-checked if needed.
- Professionalism: When using a printing calculator in a professional setting, such as in a business or office environment, maintaining print density helps to present a polished and professional appearance to clients, colleagues, or supervisors.
- Longevity: Consistently maintaining the print density on a printing calculator can help to extend the life of the machine by preventing excessive wear and tear on the printing mechanism. This can ultimately save on maintenance costs and prolong the overall lifespan of the calculator.
What steps should I follow to adjust the print density on a Casio printing calculator?
- Turn on the Casio printing calculator by pressing the "ON" button.
- Press the "2ND" button followed by the "SETTING" button.
- Use the up and down arrow keys to navigate through the settings menu.
- Look for the "PRINT DENSITY" option and select it.
- Use the arrow keys to adjust the print density to your desired level. A higher density will result in darker printouts, while a lower density will result in lighter printouts.
- Once you have selected your desired print density, press the "SET" button to confirm the changes.
- Exit the settings menu by pressing the "ON" button or any other appropriate button.
- Print a test receipt or document to check if the print density has been adjusted to your satisfaction. If not, repeat the above steps to make further adjustments.
How can I prevent print density issues on my printing calculator?
- Regularly clean the printer head and other components of the printing calculator to prevent buildup of dirt, dust, and debris that can affect print quality.
- Use high-quality paper that is compatible with your printing calculator to ensure smooth printing and prevent smudging or fading of prints.
- Avoid overloading the printer with large print jobs or printing at a high speed, as this can lead to print density issues.
- Check the settings and alignment of the printing calculator to ensure that it is properly calibrated for optimal print density.
- Replace the printer ribbon or ink cartridge regularly to maintain print quality and prevent issues with print density.
- Keep the printing calculator in a clean and dust-free environment to prevent contaminants from affecting print quality.
- If you continue to experience print density issues, consider contacting the manufacturer or a professional technician for further assistance.
How do I reset the print density settings on a printing calculator?
To reset the print density settings on a printing calculator, you will need to refer to the user manual that came with your specific model of calculator. In most cases, you can reset the print density settings by following these general steps:
- Turn off the calculator and unplug it from the power source.
- Locate the print density adjustment switch or dial on the back or side of the calculator.
- Use a small tool or a pen to adjust the print density setting to the desired level. Some calculators may have a "+" and "-" button to increase or decrease the print density.
- Once you have set the print density to the desired level, plug in the calculator and turn it back on to apply the changes.
If you are unable to find the print density adjustment switch or dial, or if you are unsure of how to reset the print density settings, it is recommended to consult the user manual or contact the manufacturer for specific instructions.